Showing posts with label stamping. Show all posts

14 February 2024

Hero Arts Spring 2024 Catalog Release Blog Hop


Hola everyone. Thanks for joining Hero Arts in celebrating the the Spring 2024 Catalog Release! If you hopped over from Dana Joy, you landed in the right place. Aren't her cards awesome? To  start the hop from the beginning, visit the Hero Arts Blog

The Hero Arts 2024 Spring Catalog is filled with new card making and stamping products to keep your creativity flowing. It features new products that are ideal for card making and stamping. 

For my first card, I used the "I Appreciate You" set. I love creating cards with a "stair-step" effect using three or more colors. I also really, really, really like pink and orange color combo! 


This card is great for Valentine's Day or any occasion you want to let someone know how special they are! 

Card Instructions
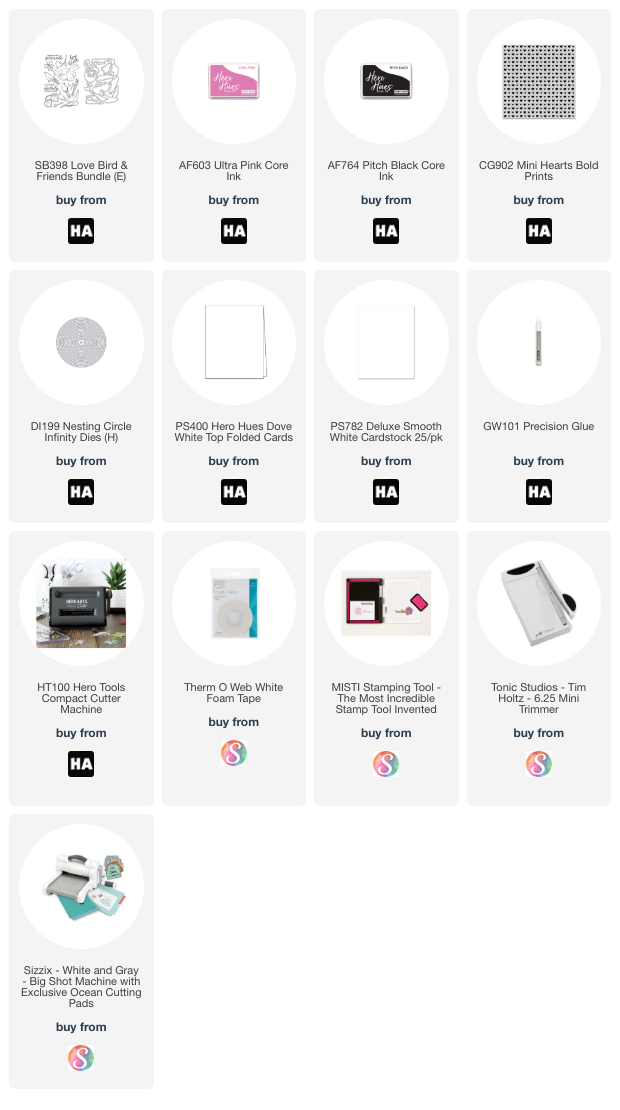
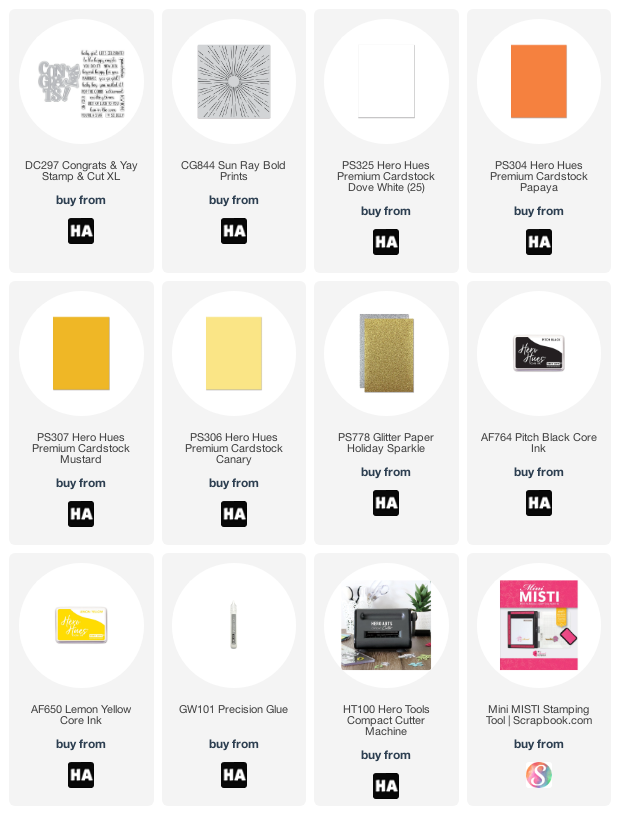
1. Cut Dove White, Ultra Pink, Azalea and Coral cardstock to 
    4.25" X 5.5" panels. 
2. Arrange and die-cut a Nesting Infinity Heart onto the Ultra Pink    
    cardstock. 
3. Place the Azalea panel beneath the Ultra Pink panel. 
4. Arrange the next smallest Nesting Infinity Heart onto the Azalea 
    cardstock - lining it up with the Ultra Pink heart. Adhere the die
    with low tack or Washi tape. 
5. Remove the Ultra Pink panel; die-cut the Azalea panel. 
6. Repeat steps 2-5 with Azalea and Coral cardstock. 
7. Heat emboss a sentiment in gold onto the Ultra Pink panel. 
8. Place Coral panel on the white panel; arrange stamp onto the 
    panel for placement; remove the Coral panel. 
9. Stamp and color the image onto the white panel
10. Die-cut the coordinating image on gold cardstock and adhere the 
      heart onto the image. 
11. Adhere the die cut panels together creating a "stair-step".
12. Adhere the stacked panel to the stamped panel with foam tape for
      dimension.
13. To complete the card, add a few sequins

Be sure to save the die-cut hearts to create another card or project. 


For my second project, I used the new Square Scallop Infinity Fancy 
Dies along with the Birthday Animals set to create a 4" X 4" notecard. 


Card Instructions
1. Create a 4" X 4" white notecard card base.
2. Die-cut a Square Scallop Infinity Die in Palm; adhere to card base. 
3. Stamp the Birthday Balloon Bold Print onto white cardstock; 
    die-cut with the next smallest Scallop Die. 
4. Stamp sentiment on balloon panel; adhere to Palm panel.
5. Stamp, color, die-cut and adhere a animal from the Birthday
    Animal Set; adhere to card front. 
6. Add enamel dots to complete. 

Please leave a comment and let me know which new items in
the Hero Arts 2024 Spring Catalog you want to get your crafty hands on! 

Thanks for taking a peek! 


Next on the hop is the talented Rachel


🩷🧡🩷

GIVEAWAY: Leave comments as you hop - Hero Arts will  give away two $50 gift cards, drawn from the comments left across the hop. The more blogs you comment on, the more chances to win! Enter by Wednesday, February 21st at 11:59pm Pacific, and the winners will be announced on the Hero Arts blog.


*Disclosure: This post contains affiliate links and I will earn a small commission when you make a purchase through the links at no additional cost to you. Thank you. 

03 February 2024

Hero Arts February 2024 MMH Countdown & Giveaway

Hola everyone! Happy Saturday and welcome to Day 2 of the three day countdown to Monday's Hero Arts February 2024 My Monthly Hero Kits release. Set your alarms as the Classic and Premium kits go live Monday, February 5th at 10am PT/1pm ET.

My card features a peek an image from the clear stamp set and coordinating die included in the Classic Kit! 


For additional peeks at this month's Classic and Premium Kits, please take a look at the cards featured yesterday on Day 1 and return tomorrow for the Day 3 peek!  


For a chance to win a Hero Arts February 2024 Kit before you can buy it, leave a comment here and every Countdown to Creativity post to be entered to win! 

First thing Monday morning, one lucky winner randomly drawn from comments left across all countdown posts, will be announced on the Hero Arts blog. The more you comment, the more chances to win. Good luck! 

Thanks for taking a peek! See you Monday at 10am PT/1pm ET

Have a great rest of your Saturday! 

01 February 2024

Birthday Poppies|Hero Arts


Good day everyone! Today I am on the Hero Arts Blog sharing a card showcasing the Coloring Layering Poppies Stencil and Golden Poppies sets. 

Please stop by to take a peek and get all of the information oh how I created my card. 

Have an amazing rest of your day! 


21 January 2024

You are the Sweetest|Hero Arts

Hola everyone! Hope you are enjoying your weekend.  I popped in to share a card I created using the Hero Arts Love Birds and Friends Bundle. This adorable set can be used for Valentine's Day or any occasion to express love or gratitude. 


Card Instructions
1. Adhere a white 4" X 5.25" panel to an A2 card base. 
2. Stamp Mini Hearts Bold Prints in Ultra Pink Ink onto a white
    piece of cardstock measuring at least 3"X3" 
3. Die-cut the hearts image using an Infinity Circle - I used the 
    10th one out from the smallest circle. 
4. Blend the end of the circle in Ultra Pink. 
5. Stamp, color and die-cut the bunnies from the set and place on
    card front - do not adhere. 
6. Stamp a sentiment in black ink on the card front. 
7. Adhere the bunnies to the card front with foam tape for dimension
8. Add embellishments: sequins, enamel dot, etc to complete.   

Thank for taking a peek! Enjoy the rest of your week. 


*Disclosure: This post contains affiliate links and I will earn a small commission when you make a purchase through the links at no additional cost to you. Thank you. 


15 January 2024

Together We Rise|Hero Arts

 Hola everyone. In celebration Martin Luther King Jr.'s birthday, I created a card using Hero Arts products.


Thanks for taking a peek. Enjoy the rest of your week! 


*Disclosure: This post contains affiliate links and I will earn a small commission when you make a purchase through the links at no additional cost to you. Thank you. 


06 March 2023

Hero Arts March 2023 My Monthly Hero Release Blog Hop & Giveaway

 Hola everyone. Thanks for joining Hero Arts in celebrating the March 2023 My Monthly Hero Kit release. If you hopped over from the awesome Mindy Eggen, you are in the right place. To start the hop from the beginning, visit the Hero Arts Blog. The entire hop list can be found at the bottom of this post, along with the giveaway information.

The March 2023 kits have more than your daily recommended amount of fruits and veggies! Our Classic Kit includes a 6x8 stamp set loaded with various fruits that are fun to color, fruit-themed puns and some everyday messages as well. In addition to the previous items, the Premium version of the kit includes additional elements to extend the potential for more cards and techniques - even more Creativity In The Box!


For my first card, I used images from the 6X8 stamp set included in both the Classic and Premium kits and paired them with Buffalo Check Pattern Bold Prints.


Card Instructions

1. Stamp Buffalo Bold Prints onto a 4" X 5.25" white cardstock panel 
    with Cotton Candy Ink.
2. Adhere the panel onto an A2 card base.
3. Stamp, color (using the medium of choice-I used Copic Markers) 
    and die-cut the oranges and slice
4. Using a stamping tool, position the images onto the card base and 
    note where you would like to place a sentiment.
5. Stamp sentiment in black Intense ink onto the card panel.
6. Adhere colored images onto the card panel.
7. Add enamel dots to complete the card.


For my second card, I used the Grocery Bag Fancy Die-an add-on to the March 2023 MMH Kits. I created a gift card holder inspired by the Thank You plastic grocery/take-out bags. 


Card Instructions

1. Adhere a 4" X 5.25" Cherry cardstock panel to an A2 card 
    base.
2. Stamp Sun Ray Bold Print with Cherry ink onto a 3.75" X 5" 
     white cardstock panel; adhere to card base.
3. Die-cut Grocery Bag die and position onto stamping tool. Be 
     sure it is flush with an edge. This will ensure your die-cut 
     will remain straight as you move it up and down.
4. Position the “Thank You” stamp in the center of what will be 
     the front of the bag.
5. Stamp the sentiment in Cherry ink onto the center of the bag; 
     keep the bag in place
6. Keeping the stamp in the same position on the stamping tool 
     door, carefully clean and dry it.
7. Gently move the die-cut down two grid lines on the stamping
    tool.
8. Stamp the sentiment in Cotton Candy ink.
9. Repeat. Now you have two perfectly spaced and centered 
     sentiments above the one stamped in the center.
10. To achieve two perfectly spaced and centered sentiments 
       below; move the die-cut up 6 lines.
11. Stamp the sentiment in Cotton Candy ink
12. Gently move the die-cut two lines up on the stamping tool
13. Stamp the sentiment in Cotton Candy ink
14. Remove die-cut from stamping tool; fold along score lines, 
       assemble and adhere to create grocery bag
15. Adhere the bag onto the lower left-hand corner of the Sun 
      Ray panel.
16. Add enamel dots to complete the card

A gift card fits perfectly into the "bag" - leaving just enough room for the recipient to slide it out! 

I hope the March 2023 Hero Arts My Monthly Hero Kit inspires you to create cards for your "main squeeze", friends and family.

Next on the hop is the talented Seeka! Thanks for taking a peek! 


My Monthly Hero Classic March 2023 


Pre-order the kit of your choice today! 
We estimate kit shipping will begin Friday, March 10th 
and continue throughout the following week.

You do not want to miss a kit-think about subscribing! There are only a limited number of Hero Arts My Monthly Hero Kits, so if you subscribe you are guaranteed to get a kit! 

GIVEAWAY: Leave comments as you hop - Hero Arts will  give away one $50 gift card, drawn from the comments left across the hop. The more blogs you comment on, the more chances to win! Enter by Sunday, March 12th at 11:59pm Pacific, and the winner will be announced on the Hero Arts blog the following week.
 

HOP LIST
Hero Arts
Hero Arts Creative Team: Channin Pelletier
Dana Joy
Emily Midgett
Ilina Crouse
Jessica Frost-Ballas
Kelly Taylor
Lydia Fiedler
Maria Willis
Mindy Eggen
Pocono Pam
Seeka
Special Guests: Jennifer Kotas
Meg Brooks
Nichol Spohr
Rebecca Keppel
And on Instagram: BreAnn Loveland


*Disclosure: This post contains affiliate links and I will earn a small commission when you make a purchase through the links at no additional cost to you. Thank you. 

02 September 2022

It's A Girl|Yixuan Scrapbooking

Hola everyone. Happy Friday! I am sharing a card I created for my co-worker Shannon.

I used the Love Baby Hands/Feet Clear Stamp YX510 and Love Heart Universal Background Cutting Die YX598 by Yixuan Scrapbooking to create my card.


Card Instructions
1. Die-cut Love Hearts onto pink cardstock; trim to 4.25" X 5.5"
2. Adhere the panel onto an A2 card base. 
3. Die-cut pink glitter nesting heart; adhere to card panel. 
4. Stamp and color Love Baby Hands/Feet; die-cut with smaller
    nesting heart; adhere to larger heart. 
5. Stamp and trim sentiment onto pink cardstock; back with 
    white cardstock; adhere to card with foam squares for 
    dimension. 
6. Die-cut small pink glitter cardstock hearts; add to card to
    complete. 


Thanks for taking a peek! Enjoy the rest of your weekend! 


*Disclosure: This post contains affiliate links and I will earn a small commission when you make a purchase through the links at no additional cost to you. Thank you. 

31 July 2022

You Brighten My Day|Hero Arts

 Hola everyone. Today I am sharing a card using the cling stamp from the Hero Arts  April 2022 My Monthly Hero Kit. The kit is sold out. If you didn't get your crafty hands on this kit, you may use another cling stamp of your choice. You may also want to subscribe as not to miss a kit again!  

Card Instructions
1. Stamp Bold Prints Cling stamp in Butter Bar and Spicy Mustard 
   Core Inks onto a 4" X 5.25" white cardstock panel.
2. Adhere the panel onto an A2 card base. 
3. Die-cut "you" from Love You Stamp & Cut XL in gold glitter and 
    Mustard cardstock.
4. Layer and adhere to card panel. 
3. Stamp sentiment in black Pitch Black core ink and trim.  
4. Pop sentiment strip onto card with foam dots for dimension. 
5. Add sequins to complete card. 

So again, you cannot purchase the cling stamp I used for my card as it was included in the sold out April 2022 MMH Kit. If you subscribe you are guaranteed to get a kit! Plus, often they sell out fast (the record is 5 hours), so you don’t have to order quickly as you are automatically allocated a kit.

There are only a limited number of Hero Arts My Monthly Hero Kits, so if you subscribe you are guaranteed to get a kit with free shipping! But.....Once they're gone...THEY'RE GONE!

The August MMH Kit will be released tomorrow 10am PT/1pm ET. You can get sneak peeks over on the Hero Arts Blog: Day 1, Day 2 and Day 3. Stop by to find out about a GiveAway! 


Thanks for taking a peek! Enjoy the rest of your weekend! 


SUPPLIES: 

If you are inspired to shop Hero Arts and additional products I used to create my cards-compensated affiliate links are listed below. I will receive a small portion of any product purchased at no additional cost to you. Thanks for your support.


28 July 2022

Congrats-Best of Luck|Hero Arts

 Hola everyone. Hope your day is going well. My supervisor has taken another position within our company. So of course, I volunteered to create a card for him! 


Card Instructions
   4" X 5.25" white cardstock panel. 
2. Die-cut "Congrats" and exclamation point in Papaya, Mustard
    Canary and Gold glitter cardstock.  
3. Adhere the the die-cuts, slightly off-set, onto the panel.  
4. Stamp sentiment in Pitch Black ink on white cardstock and 
    trim into a strip. 
5. Adhere sentiment strip onto panel.  
6. Adhere panel onto an A2 card base.
 
Thanks for taking a peek! Enjoy the rest of your week! 


Supplies:
*Disclosure: This post contains affiliate links and I will earn a small commission when you make a purchase through the links at no additional cost to you. Thank you. 

30 November 2019

Holiday Spirits


Day 30
#thedailymarker30day

Wow! How time flies! It is the last day of the 14th Daily Marker 30 Day Coloring Challenge hosted by Kathy Racoosin. And once again, it has been a great time. I enjoyed watching videos and looking at social media posts. I picked up a lot of tips and tricks from other color enthusiasts like myself. Coloring makes me happy.

For today's post, I created a bridge card using the Holiday Spirits Stamp Set by Avery Elle! I enjoy making these cards now as they lay flat and can go through the mail. On this card however, I used foam pop dots, which make it difficult for mailing. Therefore, I will need to place this in a bubble envelope and pay the additional postage. I do not not mind- this is going to a great friend! 

This stamp set appeals to me as I love when my husband and friends make Egg Nog and Coquito for the holidays.  Coquito is a traditional Christmas drink which originated in Puerto Rico and means "Little Coconut" in Spanish. It is a coconut-based alcoholic beverage similar to eggnog. 

I am soooooo looking forward to Coquito this Christmas! Not sure what he does, but my husband has added his on twist to his recipe and I now feel his version of Coquito is the best! 

I purposely double stamped the sentiment Holiday Spirits a little bit off -as too much of my hubby's egg nog or Coquito can have that effect on you!  

I just color plucked a few Copic Markers out of my case without any thought. The only thing I did know prior to coloring was that I wanted one bottle to remain clear.


For the YouTube Vid Tutorial on how to make the card- CLICK HERE

Thanks sooo much for taking a peek! 


22 November 2019

Valentina


day 22
#thedailymarker30day


Finished up Valentina from yesterday's post. I paper pierced her dress and added dimension with buy copic markers! Thanks for taking peek! 


17 February 2019

25 April 2018

IF I COULD BE GRANTED A WISH......

"IF I COULD BE GRANTED A WISH, I'D SHINE IN YOUR EYE LIKE A JEWEL."
                                                                                                                                      -Bette Midler

HOLA!!!

I had sooo much fun coloring GENIE by Krista Smith of Saturated Canary. The hair was inspired by fellow youtuber/instagramer Kristina. You can find her channel>>> HERE<<<< 


SKIN: E21, E31, E33 & R0 
HAIR:V06, V12, RV66--BV02, BV04, BV08 &C9
LIPS: V04
OUTFIT: V000, V01, V04, V12, BV01, FRV1 & GOLD METALLIC SHARPIE
HIGHLIGHT: WHITE GELLY ROLL PEN

THANKS FOR TAKING A PEEK! 


01 April 2018

2018 Stamping for Awareness Blog Hop


"Autism is not a disability, it is a different ability."
                                                                    -Stuart Duncan


Hola crafty friends!!! Thanks for stopping by! I personally know AWESOME children and adults with Autism.   
That is why I am super excited and honored to be a part of the
 2018 Stamping forAutism Awareness Blog Hop
I created this card with the Pink and Main Somebunny Stamp Set & Coordinating Die along with the 
Pink and Main Heart Puzzle Die ❤️ 
 Using colors most commonly found on Autism Awareness ribbons and puzzle pieces, I colored the image with Copic Markers. Placing a piece of sticker paper on red cardstock prior to running the heart puzzle die, ensured the puzzle pieces would stay together. The sentiment is included in the Somebunny Stamp set.
The card came together pretty easy:kraft and black cardstock, score-tape, sequins and a bit of glue.   

Thanks for taking a peek!


Please take a peek below at the following crafters 
participating in the
2018 Stamping for Autism Awareness Blog
Make sure to leave a comment for your chance to win one of the prizes from the generous sponsors. 
FOR AN EXTRA CHANCE TO WIN
Post ONE card creation to the link up over on 
You will have until SUNDAY APRIL 8 11:59PM CST 
to leave your comments.
WINNERS WILL BE ANNOUNCED
Tuesday, April 10th 
over on Veronica's blog.