Showing posts with label afro. Show all posts

24 August 2021

There is Magic in the Night!

 Hola everyone! Hope all is well! Today I am sharing a card using products from Picket Fence Studios August release. 

I am having such a great time player with Paper Glitz and wanted to created another card with the glittery goodness! 


To create my card, I applied Purple Prism, Black Rainbow and Pecan Pie Filling Paper Glitz to a 4.25" X 5.5" black cardstock panel and let dry for 15 minutes. 


I cut the panel down to 4" X 5.25" and adhered it to a black A2 card base using an ample amount of glue


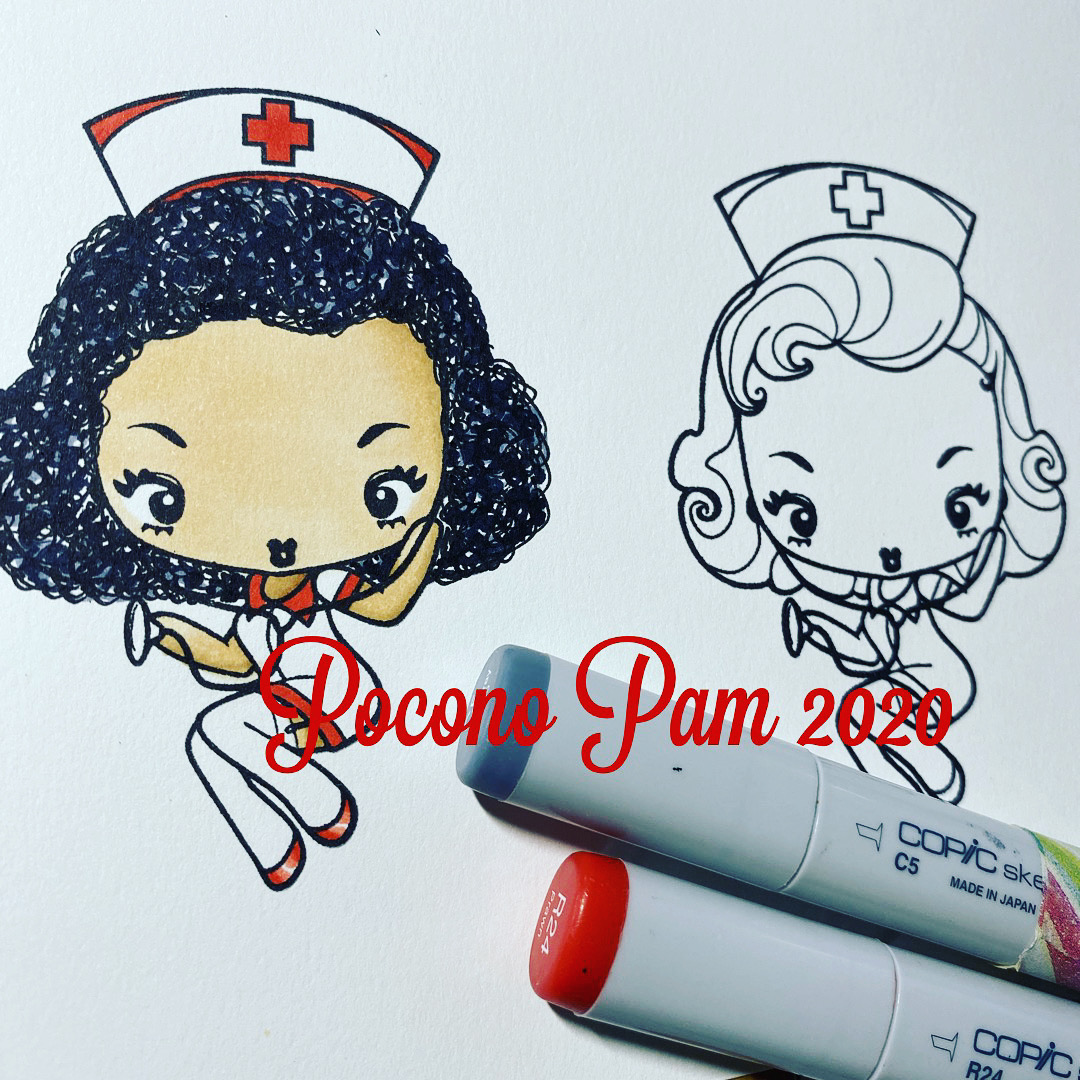
I then stamped, colored and fussy cut the image from the new Hocus Pocus Dear clear stamp set and adhered it to the panel. As you can see, I altered the image to give the cute witch an afro! You can give your stamps a whole new look just by modifying the hair or clothes! 

If you choose not to alter the hair, the Hocus Pocus Dear set does have a coordinating die


I stamped the sentiment from the new Triple Trouble set in purple ink onto white cardstock and trimmed it as I only wanted a portion. 

To complete my card, I sprinkled a few of the new Autumn Leaves Gem Mix onto the panel. 

I hope you are inspired to play with Paper Glitz, alter an image or both! 

Thanks for taking a peek! 


23 August 2021

Hello Friend-Afro

 Hola everyone! Hope you are enjoying your day! Today I am sharing a card created with the I Love You Friend set. A new release from Sweet Sentiment Stamps. 

I love to alter images and I added an afro to the male image signing "friend". 

My card was fun to create and I hope will give it a try! 


To begin, I laid the Sweet Sentiment Urchin Mandala Stencil onto a 4"X 5.25" white cardstock panel and blended Twisted Citron and Scattered Straw Distress Oxide Inks. 

I removed the stencil and adhered the panel onto an A2 white card base. 

Next,  I stamped the image in black ink onto Sweet Sentiment Premium Coloring Paper. This paper is very easy to color on and has a slight shimmer that is built into the fibers of the multilayered coated card stock.  
 

To continue, I sketched an afro in pencil and then traced it with a Copic Multiliner pen. I immediately erased the pencil thereafter as not to damage my Copic markers once I began coloring.

Continuing with the Multiliner pen, I created the afro base by making squiggles and circles within my sketch. 

To complete the afro I used C2, C4, C8 and C8 Copic markers and dotted the afro to add depth. 


I colored the remainder of the image, stamped the sentiment and adhered it to the card panel. To complete my card I added a few enamel dots. 


Have you tried to alter an image? You can give this one a try! 

Thanks for taking a peek! Enjoy the rest of your day! 


27 May 2021

You Are Wonderful!

Hola! Hope you are having a great day! Today I am sharing two slimline cards I created with the Bee Crafty Art Stamps Set- Journaling Girl: Cheer. This sweet clear stamp set can be purchased at The Craft Store

To create my cards, I followed Jessica Gerstner's YouTube tutorial on how to cut one sheet of 6X6 paper to make a slimline card without scraps. To take peek at Jess' tutorial CLICK HERE.

The hair on the image in the Journaling Girl: Cheer set is perfect to practice shading, blending and highlighting coloring techniques. If you follow me, you know I cannot resist an image that I can alter. So, for my first card, I changed the pigtails to an afro! 


After creating two cards following Jess' tutorial, I stamped the image in black dye ink onto white cardstock leaving enough room to add an afro. Dye ink is safe to use with alcohol markers. 

I then sketched an afro with a pencil and traced over it with a Copic multiliner pen. I erased the pencil thereafter as the lead does not react well with alcohol markers. 

To continue, I laid the base for the afro by making circles within the sketch with the Copic multiline pen. 

Next, I layered the afro with circles in T4, T6, T8 and T10 Copic Markers until I was happy with the look. 


I colored, stamped eyes from the set and fussy cut the remainder of the image. I created a mask and glued it to the image. 

Next, I stamped and die-cut "wonderful" from Hero Art's Wonderful Stamp & Cut set and adhered it to the card. I then stamped "You Are" onto the card and added enamel dots

To finish, I adhered the image to the card. 

For my second card, I did not alter the hair. I stamped, colored and fussy cut the image and popped her onto paper punched balloons with foam squares

I die-cut "Happy Birthday" from the Altenew's Essential Strips Die Set, matted it and adhered it to the card. 

I added enamel dots to complete my card. 

I hope you have enjoyed my cards today! Thanks for taking a peek!  


SUPPLIES: 

If you are inspired to shop products I used to create my cards-compensated affiliate links are listed below. I will receive a small portion of any product purchased at no additional cost to you.


You can receive $10 off orders over $20 for new customers at The Craft Store using CODE: POP10


22 May 2021

Make Love Not War|Isabel Cristini Digital Stamps

 Hi eveyone! Hope you are enjoying your Saturday! Today I am sharing a fun card I created with the “Seventies Bunnies” digital set. This and other adorable sets are part of the Isabel Crisitna May release and can be found in her Etsy Shop

I like working with digital images. Once they are downloaded, you may change the size to fit your project. Anything from a small notecard to a larger home decor piece. Go one step further, like I did, and alter the image to change the hairstlye or add additional elements. 


Growing up in the 70s, I Immediately fell in love with the “Seventies Bunnies” Set. The VW Wagon made me smile because my parents had red one! I knew I wanted to alter and color the bunny with the guitar as he reminded me of Jimi Hendrix! 


To create my card, I dowloaded the image and printed the included Easy Print page set at 120%. This made the bunny, flowers and sentiment large enough for my A2 card design.


I altered, colored and fussy cut the bunny and three flowers and set them aside. I then used the Hero Arts Sun Background stencil to airbrush a few Copic colors onto a white cardstock panel.

Next, I trimmed the panel down to 4" X 5 1/4" and die cut the circle of the sun ray. I then cut "Make Love Not War" a bit larger than the circle and adhered it behind the card panel opening.


I adhered the panel to the card base and assembled the bunny, flowers, and sequins to complete the card. I popped the bunny with foam squares for dimension. 

I hope you enjoyed my card and will give Isabel Cristina digital stamps try! 


Thanks for taking a peek! Enjoy the rest of your week! 


09 May 2021

THREE ROOM STUDIO SATURDAY CHALLENGE #35-MOTHER'S DAY


Hola everyone! Today's Three Room Studio Challenge is: Mother's Day. I used the Welcome Little One clear stamp set to create my card. As you can see, I altered the image to give my mermaid mom an afro. 

To create my card I stamped the image and sketched out the afro. It was very easy as most of the hair was part of the image. I then colored and fussy cut the image and set it aside. 

Next, I glued 3/4" X 3" strips of Peony, Papaya, Azalea and Arctic cardstock onto white cardstock and die-cut them with a circle nesting die.  

I then die-cut a larger circle into a  3 7/8" X 5 1/8" white card panel, stamped the sentiment below the circle and adhered the striped circle to the back of the panel. 

After heat-setting sand embossing powder on to scrap paper, I cut them into 4" strips, cut the ends and adhered them to the front of the card panel. 

I adhered the newly coiffed mermaid mom to the card panel, added enamel dots and placed the panel onto an A2 card base.

If you would like to play along in today’s challenge, please stop by the Three Room Studio blog for all of the details. One lucky participant per month will win a $15 gift certificate to the Three Room Studio shop!


Thanks for taking a peek.

SUPPLIES: 

If you are inspired to shop Three Room Studio and products I used to create my Mermaid Mother's Day card-compensated affiliate links are listed below. I will receive a small portion of any product purchased at no additional cost to you. 


05 March 2021

Hero Arts March 2021 MMH Countdown & Giveaway


Hola everyone! Today I am sharing a card as part of Day 1 of the countdown to the release of the Hero Arts March 2021 My Monthly Hero Kit. (The kit and link go live on March 8th!)


The projects you can create with this kit are limitless! I love the images and I knew immediately I wanted to add an afro to the little boy! My card was fun to create and if you purchase the kit, I hope you will give it a try! 


To begin, I stamped, added an afro, colored and fussy cut the image and adhered it to the lower left corner of a 4" X 5 1/4" Dove White panel. I then added a shadow with a Copic Marker.  

Next, I blended a few Copic colors onto a strip of white cardstock measured at 3/4" X 2".  I then stamped the sentiment onto the strip and matted it with canary cardstock. I popped the sentiment to the center of the card panel with foam squares


To continue, I heat embossed Gold Embossing powder onto a scrap sheet of cardstock and die cut several stars from the 5-Point Stars Infinity Dies Set.

I glued the stars to the panel, then adhered the panel to a side-folding A2 card base. Easy right? I think this is a perfect card for a kid of any age! 

WIN A KIT BEFORE YOU CAN BUY IT: Just leave a comment on this (and every) Countdown to Creativity post. We'll randomly draw one lucky winner from all the comments left across all countdown posts. The winner will be announced Monday, March 8th at 10am Pacific/1pm Eastern. The more you comment, the more chances to win. Good luck!


I hope I have inspired you today! Please stop by the Hero Arts blog to see the other creative team member's creations. Don't forget to come back on Monday to check out the full release! 


Thanks for taking a peek! Enjoy the rest of your weekend! 


SUPPLIES: 

If you are inspired to shop Hero Arts and products I used to create my card-compensated affiliate links are listed below. I will receive a small portion of any product purchased at no additional cost to you. 


03 May 2020

13 April 2020

COLOR CHALLENGE DAY 6: FAIRY MINI CLASS


DAY 6


I took time out this evening to enjoy the Fairy Mini Class taught by Jammie of Sweet Sentiment. I ordered the class a few weeks ago. My clear stamp: Layla by The Greeting Farm, arrived soon after. She is exclusive to the class. But work and adjusting to life during a pandemic got in the way. 

The Fairy Mini Class was a great distraction from all of the craziness. Jammie teaches how to color Layla in both black line and no-line in a side by side comparison. I must admit, my no-line was not a pretty sight at all. It was SCARY!!! I am not sure if I am over-thinking my coloring or just need the love and support of lines. LOL!!!! I will keep practicing no-line and share a better version at a later date. 

As you can see, I did give Layla an Afro. I love how hairstyles can change the entire look of an image. 


Jammie has this and other mini classes. Check them out! >HERE<


If you want to play along in the 30 Day Coloring Challenge, check out Kathy's blog, The Daily Marker for all details. Be sure to use #thedailymarker30day on Instagram or you can join the FaceBook Group

Be Safe. Be Well. 

Thanks for taking a peek! 


10 April 2020

COLOR CHALLENGE DAY 3-APRIL 2020


DAY 3 

I loooooove how an afro looks on SOHO by Kenny K Stamps! She reminds me of Pam Grier as Foxy Brown. I hope you are enjoying the coloring challenge hosted by Kathy over at The Daily Marker.  Coloring is a safe and relaxing way to stay indoors during this time!  


AsI mentioned in a previous post, I enjoy altering my stamps to for various reasons. To make images reflect my family, friends, co-workers and neighbors is one. But. also to find other ways to add life and creativity to images. 


If you want to play along in the challenge check out Kathy's blog for all details. Be sure to use #thedailymarker30day on Instagram or you can join the FaceBook Group

Thanks for taking a peek! 


18 March 2020

COLOR CHALLENGE DAY 18


DAY 18

Today I am sharing a Work In Progress (WIP). I have been having fun sharing my afros, but I wanted to alter this cute The Greeting Farm Laundry stamp with another hairstyle as well. I gave Shirley Temple curls a try. I am not 100% happy with the turn out but that is what this challenge is about---challenging yourself. I will change the hair covering her forehead. I will give it try again with curls or a bang. 

I do like how the afro turned out. I used the dot method and all of the "squiggles" and curls came from the Copic multiliner. 


If you want to play along in the challenge check out Kathy's blog for all details. Be sure to use #thedailymarker30day on Instagram or you can join the FaceBook Group


Thank for taking a peek! 

16 March 2020

COLOR CHALLENGE DAY 16


DAY 16
*affiliate link


Social distancing is not hard for me as I am a homebody. I enjoy hanging out with family at home or playing in my craft room. The scary part of this all, is the ugliness it brings out of some people over the fear of the lack of toilet paper or Ramen Noodles. 

I am saddened for the millions of children that go without free meals provided by schools. They will miss a smile or hug given by a friend or teacher that they will not receive at home. Or the elderly and shut in that are unable to get the care and essentials they need. 

I will make sure to check in on my friends and neighbors. And will look forward to the day when this is all over. Hopefully by Christmas. 

I added an afro and puffs to these sweet images by My Favorite Things* Aren't they sweet?!? 

If you want to play along in the challenge check out Kathy's blog for all details. Be sure to use #thedailymarker30day on Instagram or you can join the FaceBook Group


Thank for taking a peek! 


14 March 2020

COLOR CHALLENGE DAY 14- AFROS & MORE BY Kathy Racoosin


Colored by: Kathy Racoosin
Image by Jammie Clark

I am not going to post an altered image today as I would rather share another post. Our 30 Day Coloring Challenge hostess Kathy Racoosin, addressed the ignorant comment I recently received about coloring afros on her blog today: Day 14: AFROS AND MORE

When you have a chance, please read her post! Thanks for your positive comments of love and support! Remember, be kind to unkind people because they need it the most. And if you cannot be kind.....be quiet. 
  

Thank for taking a peek! 


13 March 2020

COLOR CHALLENGE DAY 13


DAY 13

When I attempted to alter Cheeky Nurse by The Greeting Farm, I did not like the end result. Her afro looked like a big fuzzy helmut. So, I followed the outline already in place and came up with a cute hair-do! 

Remember to always leave enough white space when creating your afro! 


If you want to play along in the challenge check out Kathy's blog for all details. Be sure to use #thedailymarker30day on Instagram or you can join the FaceBook Group


Thank for taking a peek! 

12 March 2020

COLOR CHALLENGE DAY 12


DAY 12 

Altered the cute Perfect Angel by The Greeting Fam Stamps. Turned her already cute hairstyle into an afro! No matter hairstyle she has, I love her little lips! 

I hope you are enjoying my afros as much as I am creating them! 


If you want to play along in the challenge check out Kathy's blog for all details. Be sure to use #thedailymarker30day on Instagram or you can join the FaceBook Group


Thank for taking a peek!